


How to Use TNet: Step-by-Step Instructions
Click on the video to pause or play; double-click to make full screen
Accessing the User Portal
The TNet user portal is where you can send your electronic letter to your donor family. To access the user portal, click on the “Send Letter” button (envelope icon) next to the “Home” button at the top of this website.
You may also click here.
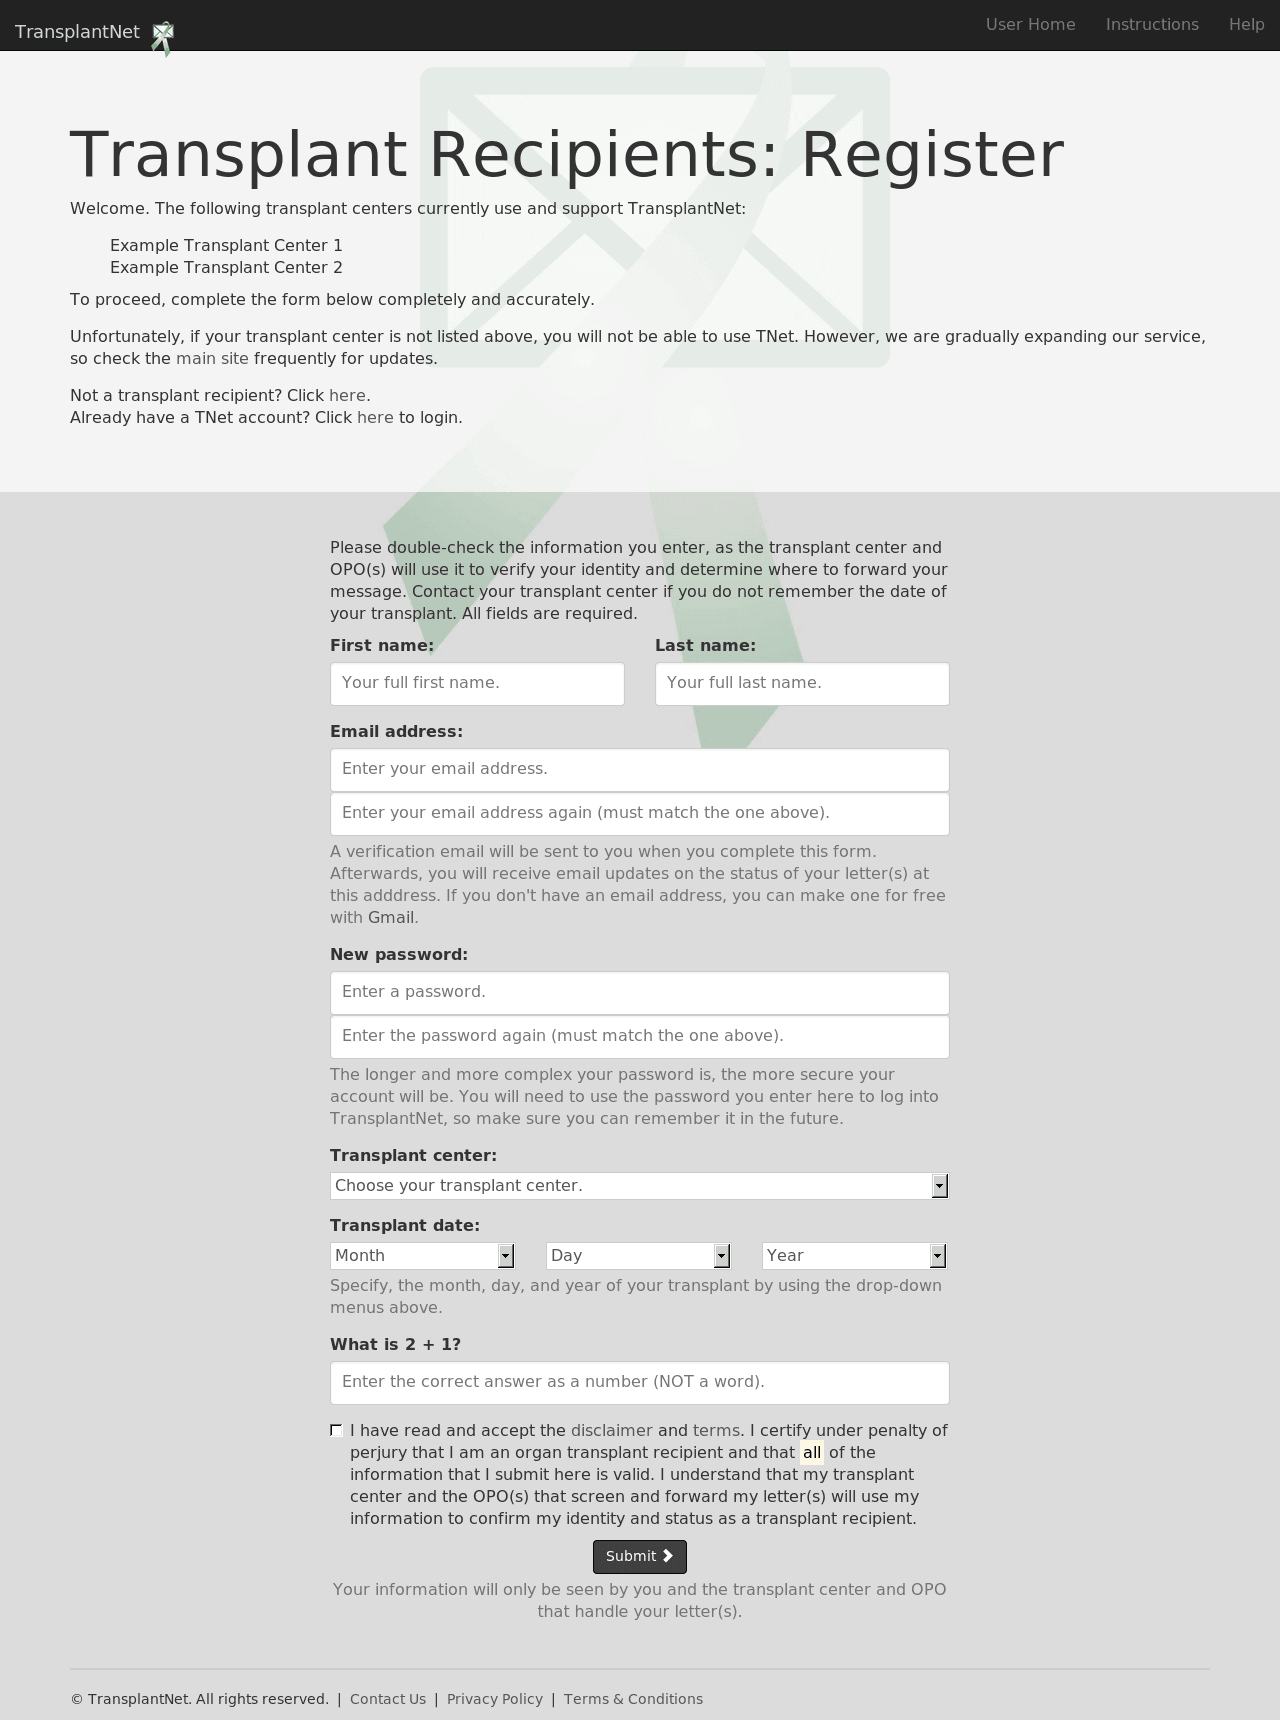
1. Register and Verify Account
- On the User Portal, click on the “organ transplant recipient” button. This will take you to the login page. If you have already made a TNet account, enter your email address and password here.
- If you have not made a TNet account yet, click “Register now”.
- To register, you will need to enter an email address. If you don’t have one, you can make a free one with Gmail).
- You will also need to know the date of your transplant
- Fill in all of the fields, read and accept the terms and privacy policy, and hit the “Submit” button at the bottom.
- After you submit the form, our system will send you an email from “TransplantNet Portal” (gro.tentnalpsnart@ylperon). This email could take up to fifteen minutes to reach you, so please be patient.
- If the confirmation email does not come for a while, you may want to check your spam box. Once you receive and open the email, click on the link or copy and paste it into your address bar. Our system should then tell you that your account was verified and that you may now log in.
- If you still cannot find the confirmation email, please email admin@transplantnet.org.
Click to enlarge.
2. Log into Your Account
- Head back to the transplant recipient login page and enter your email address and password.
- Hit “Submit.”
- Note: if you ever forget your password, there is a link to create a new one on the login page.

Click to enlarge.
3. Write Your Letter
- Write your electronic letter to your donor family on a word processor like Microsoft Office, LibreOffice, Notepad or TextEdit.
- We recommend that you do this on your computer first so that you won’t accidentally lose what you have written by writing directly on our “Send a Letter” page and then leaving the page by mistake.
- Remember to keep our guidelines and suggestions in mind.
- Once you have written your letter, copy and paste your letter into the big text box on the “Send a Letter” page that you reach after you log in.
- Click here if you do not know how to copy and paste.
- With the text box toolbar, you may add formatting to your letter if you would like. You may also hit the print icon to print your letter.
- The letter input box should look like it does in the screenshot here.
- If it does not show up correctly for you, try refreshing the page and/or restarting your internet browser.
- If it still does not work, please contact support.
- You may then select and insert up to three image files (with extensions .jpg, .png, or .gif) from your computer to include with your letter. Click here for information on including a photo of yourself.

Click to enlarge.
4. Decide If You Would Like to Publish Your Letter
- If you decide that you would like your letter to be posted on our website, click the corresponding “Yes” option.
- If you would like to only allow a certain part of your letter to be public, click “Yes, but only a certain excerpt of my letter.”
- A text box under the option will then appear — paste your desired excerpt here.
Please note that all public letters will have any and all potentially identifiable information (full names, locations, contact information, etc.) about their author and their intended recipient removed prior to being posted. They may be shared by particularly moved visitors on social media platforms like Facebook, Google+ and Twitter.
We have made the option to publish your letter available because we believe that your words, more than any others’, will give the public a heartfelt and compelling view of how much organ donation impacts both donor and recipient families. Public letters written by real transplant recipients and donor families could very well inspire many to become donors and alleviate the donor shortage. However, we do not expect most users to feel comfortable with sharing their letter with the public — the default choice is no.

Click to enlarge.
5. Send Your Letter
Once you are ready, all you need to do is hit the “Send my Letter” button. Your letter will then be sent to your transplant program’s TNet inbox.
Please check over your letter before sending. There is no way to “take back” a letter on the website once it is sent; if you wish to do so, you must contact your transplant program. Additionally, you may want to review our terms and conditions agreement.
After You Hit “Send”
- We will email you when your transplant center approves your letter and passes it on to the appropriate OPO.
- If the OPO has a TNet account, our system will email you when the OPO forwards your letter to your donor family.
- If the OPO does not have a TNet account, your transplant center will forward it to the OPO by email and it will then be handled outside of TNet — you will no longer receive status updates directly from our system.
- You will also receive an email with the contents of your letter if a coordinator needs to send your letter back to you (for example, if you need to make revisions or if your donor family is not ready to receive correspondence at the current time).
Know that the coordinators who process your letter may make minor edits to your letter to comply with the policies of their respective organizations. These may include removing a last name, removing an image, or omitting identifiable information. Most likely, the coordinators will contact you if they make such edits to your letter.
If your donor family wishes to respond to your letter, they may do so through the TNet system, the manual U.S. postal mail process, or personal contact addresses depending on each situation. You may continue to use TNet to communicate with them
We suggest that you delete your TNet account if you know that you will not be using it in the future. You can do this on the “Settings” page, which is linked on the user navigation top bar. You may only delete your account once you have no letters being processed in our system.